MenuClass - 1.0.3
A flexible graphical menu in pygame/python for text and/or images
Scott Barlow
(spectre5)
This is a menu class written for pygame/Python. The menu is designed to work with a program using a finite state machine (but it could also be easily modified to have the 'buttons' return functions). The menu 'buttons' contain a 'state' (a state could really be anything you want) and this 'state' is what is returned when the user selects/presses the button. The program controlling the menu can then act on this returned state as required. This helps to write non-blocking code.
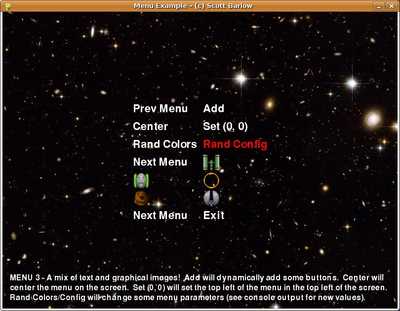
The menu can have text buttons, image buttons (that get highlighted on all sides to detect which is selected), or any combination of the two.
The menu is flexible and can be dynamically changed. The 'buttons' will auto-magically update themselves the next time they are drawn to the screen (via the update method, which calls the draw method). The draw method should not be called itself. 'Buttons' can be added or removed at any time.
The menu can be positioned by the top left corner (a rectangle containing all buttons is what gets moved). It can be changed to center the entire menu (i.e. center that containing rectangle) on that same position coordinate. Or the user can center the entire menu on the self.draw_surface. Note that if the pygame screen is given to the menu, then the entire window will be available to be drawn to. But if the user gives the menu another pygame surface, then that surface itself will need to be blitted to the pygame screen at some point. Furthermore, the user can align the buttons to align on the left, to be centerd, or to align themselves on the right. Also, they can be aligned vertically on the top, center, or bottom.
The user can dynamically change the colors of the font/highlights, the padding between buttons (left/right and top/bottom), the thickness of the highlight around image buttons, and the orientation of the menu (if the 'buttons' will be stacked top to bottom ('vertical') or left to right ('horizontal').
The best way to figure out the menu is to tinker around with it. Check out the basic menu with the 'example_simple.py' example provided and then see the more powerful 'example.py'.
In 'example.py', use 'r' to remove any button you select. Dynamically add buttons on 'Menu 3' via the 'Add' button and see the flexibility of the menu via the 'Rand Colors' and 'Rand Config' buttons which will randomly change the colors and other parameters of the menu (run the example from the console to see the output - the newly assigned parameters).
Lastly, all files are heavily commented. Read the top of each file for the general information about the file and how to use it.
Note: A doxygen config file is also included. To get the doxygen output, simply type 'doxygen doxy' from the folders location.
Last Note: I believe that this code would work with Windows/Mac, but I only have Linux and I have successfully run it on several different Linux distros.
Changes
Very minor updates and a bug fix. Changed to a zip file for windows users unfamiliar with .tar.gz files.
Links
Releases
MenuClass 1.0.3 — 24 Aug, 2009
MenuClass 1.0.0 — 22 Aug, 2009
